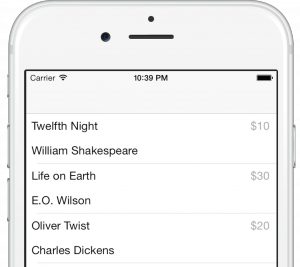
I’m a RubyMotion newbie and I wanted to create a custom table view cell which simply had three labels – a title, a subtitle and a third label on the right side of the cell. I found a few help around for creating custom table view cell programmatically, which helped me do the job, but it didn’t look as nice as I wanted. Moreover, the benefits of using Interface Builder to easily layout and style the labels was something I was looking for. Fortunately, I was able to get around it myself after fiddling about it. Thought I’d share it for those who are looking for similar.
This post assumes you already have a table view controller in your project to which you want to add a custom table view cell. So I won’t go into much detail of adding them.
I use ib gem to use Interface Builder with RubyMotion. If you don’t, I highly recommend you do. My aim is to add a custom cell with three labels inside a table view controller, call it BooksController.
Create the table view controller
Create the table view cell class
Build the interface
Now, open Interface Builder using the rake ib command in Terminal from the root of your project. The ib gem will automatically create the appropriate interfaces and properties for you to be used inside IB.
Set Custom class for the table view controller in IB
Assuming you have a table view controller added to your storyboard, choose the table view controller and open Identity inspector on the right. Set the class to your controller name – “BooksController” for me.
Set datasource and delegate of the table view controller
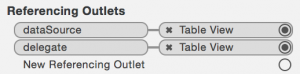
Perhaps this is already done for you or drag them from Outlets inspector to the controller itself.
Set Custom class for cell
Now choose the table view cell on the storyboard and set the class to the class you created – CustomBookCell in my case.
Set Identifier for cell
In the Attributes inspector, set the Identifier of the cell to the identifier you specified in the code – BookCell for me.
Set tableview cell Style to Custom
In the Identity inspector, set the Style to Custom from the drop down.
Add three Labels to cell
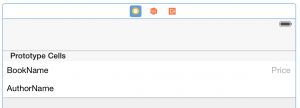
Now add the three labels we need on the cell by dragging them from the Object library.
Style the labels as necessary
Feel free to make them look good.
Add auto layout constraints
Once the labels are in place, it is a good idea to set the auto layout constraints. This is easy as pie with IB and another great reason to use IB. Simply select the three labels together and choose from menu Editor -> Resolve Auto Layout Issues -> Reset to Suggested Constraints.
Drag outlets from Connections inspector to the labels as required

Finally, open Connections inspector and now you should see the outlets you created in your custom cell class under Outlets. Drag them to their respective labels.
Save and quit Interface Builder and fire up the app in simulator. You should now see the table view with your custom cell.
A sample app for this is available on Github.